What are dry rot repair techniques? For your home’s overall wellness, it is imperative that you maintain the integrity of your roof. A well-maintained roof keeps the building secure and sound, guards against weather damage, and prevents water damage. Dry rot, however, is one of the unseen dangers to the structural integrity of your roofing material.
Dry rot, which is sometimes ignored until serious damage has been done, can weaken your roof’s structural integrity and result in expensive repairs as well as perhaps hazardous living conditions. It is a type of fungal decay that can wreak havoc on wooden structures, particularly in areas that are consistently exposed to moisture.
Unlike wet rot, which requires a continuous presence of water, dry rot can spread through wood that is intermittently damp, making it a silent and persistent threat.
What is Dry Rot and What Causes It?
Dry rot, scientifically known as Serpula lacrymans, is a type of fungal decay that affects timber. Unlike its name suggests, dry rot can occur in wood with a moisture content of 20% or more, making it a significant concern in structures where wood is exposed to fluctuating moisture levels.
This type of rot is particularly dangerous because it can spread rapidly through and across wood, severely weakening the structural integrity of buildings, including roofs, floors, and walls. Dry rot is characterized by its ability to transport water from damp areas to dry wood, allowing it to thrive in conditions where other fungi cannot.
This fungus feeds on the cellulose and hemicellulose components of wood, causing the wood to become brittle and crumbly. As the decay progresses, the affected wood often takes on a brownish hue, develops deep cracks, and can be easily broken apart by hand.
1. Causes of Dry Rot
The primary cause of dry rot is the presence of moisture, which creates an environment conducive to fungal growth. Poor ventilation is often a key contributor, as it allows moisture to accumulate in enclosed spaces, providing the perfect conditions for dry rot to develop.
Leaking roofs, plumbing leaks, and inadequate sealing around windows and doors can all lead to moisture infiltration, further increasing the risk of dry rot. Certain environmental conditions can also accelerate the onset and spread of dry rot.
Warm temperatures and high humidity levels create an ideal habitat for the fungus. Buildings that are not regularly inspected and maintained are particularly vulnerable, as unnoticed leaks or damp areas can provide the perfect breeding ground for dry rot.
2. How to Identify Dry Rot
Identifying dry rot early is essential to prevent extensive damage. Symptoms of dry rot include a musty, damp smell, the presence of spore dust that looks like fine orange or reddish-brown powder, and the appearance of white, fluffy mycelium in humid conditions.
The wood affected by dry rot often feels spongy to the touch and can be easily punctured with a screwdriver or other tool.
| Symptom | Description |
| Musty, damp smell | A distinctive, unpleasant odor often associated with fungal decay. |
| Discolored wood | Wood may turn dark brown, yellow, or grey as it decays. |
| Brittle and crumbly texture | Affected wood becomes fragile and can easily break apart. |
| Deep cracks in wood | Longitudinal cracks along the grain of the wood, indicating severe decay. |
| White, fluffy mycelium growth | Fungal mycelium that can appear in humid conditions, resembling cotton wool. |
| Orange or reddish-brown spore dust | Fine dust released by the fungus, often found around the affected area. |
Inspecting your roof and other wooden structures regularly for these signs can help catch dry rot in its early stages. Pay particular attention to areas that are prone to dampness or poor ventilation, such as attics, basements, and areas around chimneys and vents.
Where is Dry Rot Common on Roofs and How Can It Be Mitigated?
Dry rot can be particularly insidious because it often develops in areas of the roof that are not immediately visible or easily accessible.
- Along the eaves and soffits. These areas are prone to moisture accumulation due to poor ventilation and water runoff from the roof. Over time, this constant exposure to moisture creates the perfect environment for dry rot to thrive.
- The roof valleys. These valleys can collect leaves, debris, and water, which, if not properly cleared and maintained, can lead to moisture penetration and subsequent dry rot.
- The areas around chimneys and vents. The flashing and seals around these structures can deteriorate over time, allowing water to seep in and create damp conditions.
- Roof decking and rafters. These often hidden beneath layers of shingles or tiles, can harbor dry rot if there is any leakage or condensation build-up.
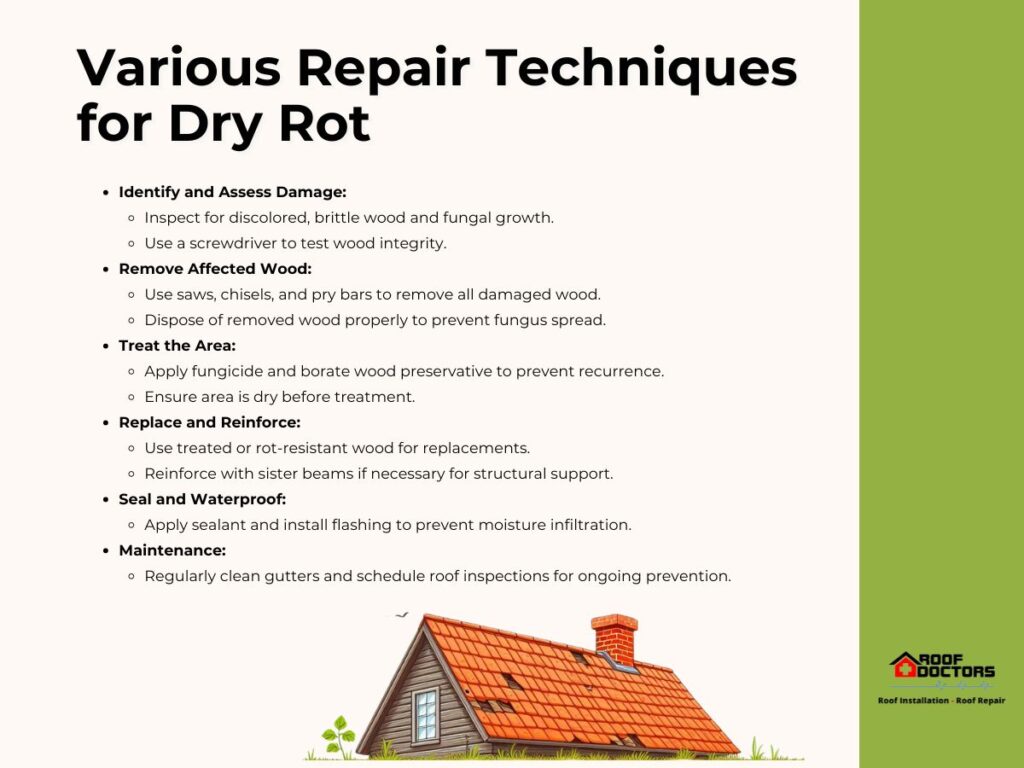
Various Repair Techniques for Dry Rot
A methodical technique is necessary for good dry rot repair in order to guarantee that the fungus is completely removed and the roof’s structural integrity is restored. The solidity of timber structures can be undermined by dry rot, thus prompt and comprehensive repairs are crucial.
Homeowners may quickly address this problem and stop additional damage by being aware of the several dry rot repair solutions available.

1. Identify and Assess the Damage
Before any repair work can begin, it is essential to identify and assess the extent of the dry rot damage. This involves a thorough inspection of the roof to locate all areas affected by dry rot. Look for signs such as discolored or brittle wood, a musty odor, and the presence of fungal growth.
Use tools like a screwdriver to test the integrity of the wood; if it penetrates easily or crumbles, dry rot is likely present. Once the damaged areas are identified, determine the extent of the damage. This will help in planning the repair process and deciding whether minor repairs or major structural replacements are needed.
Detailed documentation, including photographs and notes, can also be useful for insurance claims or when consulting with a professional.
2. Removing Affected Wood
The first step in repairing dry rot is to remove all affected wood. This is crucial because leaving any infected material behind can lead to further decay. Use tools such as saws, chisels, and pry bars to carefully cut out and remove the damaged sections of wood.
Ensure you remove all of the rot, as even small remnants can cause a recurrence. Safety is paramount during this process. Wear protective gear, including gloves, masks, and goggles, to avoid exposure to fungal spores and wood dust.
Proper disposal of the rotten wood is also important to prevent the spread of the fungus. Seal the removed material in plastic bags and dispose of it according to local regulations.
3. Treating the Area
After the removal of the affected wood, treat the surrounding area with a fungicide to kill any remaining fungal spores and prevent future outbreaks. Ensure the area is completely dry before applying the treatment, as moisture can negate its effectiveness.
Follow the manufacturer’s instructions for application and drying times. In addition to fungicide, you may consider using a borate wood preservative. Borate treatments penetrate the wood and provide long-term protection against fungal decay and insect infestation.
This step is particularly important in areas that are prone to high moisture levels.
4. Replacing Wood Components
Once the area is treated, replace the removed sections with new, treated wood. Choose materials that are resistant to rot and decay, such as pressure-treated lumber or naturally rot-resistant woods like cedar or redwood.
Cut the new wood to fit the exact dimensions of the removed sections and ensure a snug fit. Secure the new wood in place using appropriate fasteners, such as galvanized nails or screws, which are resistant to corrosion.
Apply wood preservative to the cut ends and any drilled holes to provide additional protection against moisture and decay.
5. Reinforcing Structural Integrity
In some cases, especially if significant amounts of wood were removed, it may be necessary to reinforce the structural integrity of the affected area. This can be done by installing sister beams, which are additional beams placed alongside the existing ones to provide extra support.
Use metal brackets or plates to secure the new beams and ensure they share the load evenly. Ensure that the repairs align correctly with the existing structure and that there is no imbalance in load distribution.
This reinforcement is crucial to maintain the overall stability and safety of the roof.
6. Sealing and Waterproofing
After the structural repairs are complete, the next step is to seal and waterproof the area to prevent future moisture infiltration. Apply a high-quality sealant to all joints, seams, and exposed wood surfaces.
This will create a barrier against water and help keep the wood dry. Install flashing around repaired areas, such as chimneys, vents, and roof valleys, to direct water away from vulnerable spots.
Ensure that shingles or tiles are properly installed and overlap correctly to prevent water from seeping underneath.
7. Final Inspection and Maintenance Tips
Conduct a final inspection to ensure all repairs are solid and the area is fully protected against moisture. Check for any remaining signs of rot or potential weak spots that may need additional attention. Ensure that all treatments, reinforcements, and waterproofing measures are properly in place.
| Tool/Material | Purpose |
| Screwdriver | For probing and testing the integrity of wood. |
| Saw | For cutting out and removing affected wood sections. |
| Chisel | For removing smaller sections of damaged wood. |
| Pry bar | For prying out large pieces of rotten wood. |
| Protective gear (gloves, mask, goggles) | For safety during the removal and treatment of dry rot. |
| Fungicide | For treating areas to kill remaining fungal spores. |
| Borate wood preservative | For providing long-term protection against fungal decay and insects. |
| Treated or rot-resistant wood | For replacing removed sections to prevent future decay. |
| Galvanized nails/screws | For securing new wood, resistant to corrosion. |
| Sealant | For sealing joints and preventing moisture ingress. |
| Flashing | For waterproofing around vulnerable areas like chimneys and vents. |
| Ridge vents, soffit vents, attic fans | For ensuring proper ventilation and reducing moisture buildup. |
Ongoing maintenance is key to preventing future dry rot. Regularly clean gutters and downspouts to ensure proper water drainage. Keep the roof free of debris, which can trap moisture and cause damage. Schedule periodic professional roof inspections to catch any potential issues early and address them promptly.
Preventing Dry Rot in California: Climate-Specific Maintenance Practices
Addressing dry rot promptly and effectively is crucial for maintaining the structural integrity of your roof and ensuring the safety and longevity of your home. In addition to these general repair techniques, it is important to consider climate-specific maintenance practices, especially in regions like California.
The unique weather conditions in California, characterized by high humidity and significant temperature fluctuations, can worsen the conditions that lead to dry rot. Implementing climate-specific measures can provide an added layer of protection and ensure that your roof remains in optimal condition.
The fluctuating moisture levels can accelerate the onset of dry rot, making proactive and region-specific maintenance practices essential. Incorporating these climate-specific practices into your overall roof maintenance plan can significantly reduce the risk of dry rot.


